INGREDIENTS FOR PIE CRUST:
2 1/2 cups flour (sifted or fine flour)
1/2 cup shortening or lard (Lard makes a really flaky crust)
1/2 cup chilled butter (NOT MARGARINE! Margarine is NOT a substitute for cooking or baking with butter! If you use margarine you will fail!)
1 egg white
1 teaspoon salt
5-6 tablespoons ice cold water
TOOLS FOR PIE CRUST:
Butter knife for adding shortening/butter
Dough cutter (see photo)
Wax paper
Tablespoon measure for water
Mixing bowl
9 or 10 inch pie plate
Rolling pin
Sharp knife (I use a thin boning knife)
Dinner fork
INSTRUCTIONS FOR MAKING PIE CRUST:
Introduction -
My original crust recipe came from the best cookbook ever printed, THE JOY OF COOKING. Over the years I have tweaked it and I believe that I have improved on it.
About the tools - I have a nice big hunky KitchenAid mixer. I have tried and tried to make pie crust dough with it, following several recipes and methods, but I have failed to come close using the machine. To make a perfect crust you have to do it by hand, with the tools I have listed. The essential tool is the hand-held dough cutter. Here is a photo of one:

My dough cutter is slightly different and more modern. It is stainless steel with sharp knife-like curved blades instead of wires. I love it and it does the job!
1. Mix flour and salt in a large mixing bowl. I use metal bowls and sometimes the orange plastic bowls you will see in my photographs that follow.
2. Using a butter or bread knife, add half of the shortening (or lard) and the butter to the flour. I add it in tiny bits, about the size of grapes.
3. Using the dough cutter, mix the shortening and butter into the flour. Push down and twist the cutter and rotate the bowl, until you have thoroughly mixed-in the shortening and butter.
4. Repeat the process, adding the remainder of the shortening and butter and mixing it into the flour paste, until the dough is in little pieces about the size of kidney beans or peas. This is subjective. If the dough is too wet, I sprinkle a little more flour on it and mix it in. The dough should not be a consistent mass with smooth sides. It will look cracked and loose. That is perfect.
5. Sprinkle five to six tablespoons of ice cold water over the dough.
6. Using clean hands, mix the dough paste together and knead it slightly. Again, do not try to get it into a single smooth-sided mass. It will appear cracked and with uneven edges.
7. Spread enough wax paper on a clean flat table surface to hold a complete pie crust. I place two long pieces together, slightly overlapped.
8. Split the ball of dough in two parts: 2/3 and 1/3 of the original ball. Wrap the smaller portion in plastic or foil and place in the refrigerator (This will be used later for your lattice crust on top of the pie.)
9. Slap the 2/3 size ball of dough in the middle of the wax paper work area, press down with your hand and slightly flatten it to about 1 inch in thickness.
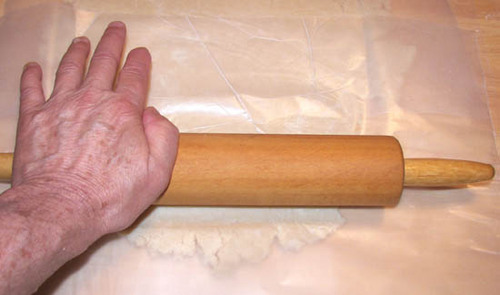
10. Place two more pieces of wax paper over the top of the dough.

11. Starting in the middle of the dough, push out and pull back on the rolling pin, pressing down on the wax paper and the dough. Rotate your direction like a clock hand so that you will flatten and squeeze the dough into a rough circle as you work. Take your time. Don't hurt yourself doing this. It can result in back aches like I get from doing it! (Just kidding, but do it easy!)
12. When you have flattened the dough to about 3/16 or 1/8 inch thickness and it is wider across than your pie plate, carefully peel off the top wax paper and discard the paper.

13. (Here I usually lightly grease the inside of the pie plate with butter.) Invert your pie plate. Lay it on the crust. Slide a hand under the bottom wax paper and hold the paper and dough against the inside of the plate. Carefully turn over the whole thing and set down the plate.
14. Very carefully, peel off the wax paper and discard it.

15. Using fingers, press the thin dough against the plate, bottom first, then sides and all the way around the rim. Use excess dough to patch cracks or holes in your dough crust.
16. Using a sharp knife, cut away the excess all around the plate rim. (I usually save the excess dough with the 1.3 of the ball that I refrigerated.)

17. Using fingers, twist the dough edges along the rim of the pie plate. This will help contain any overflow juices during baking. Prick holes in the crust bottom to prevent air bubbles while baking. I use a dinner fork to do this.
18. Brush a tin layer of raw egg white over the crust.
19. Preheat oven to 450F. Bake for 12 minutes in the middle of your oven. The pie shell crust should only turn slightly golden. You don't want any brown crust yet!

20. Remove and cool on a baker's cooling rack so that air can circulate completely around the plate including the bottom. DO NOT REFRIGERATE.
Now you have a pre-baked pie shell. The next phase is to prepare your pie filling. In the next post I will show how I make my Strawberry-Rhubarb pie filling and complete the lattice top crust.


